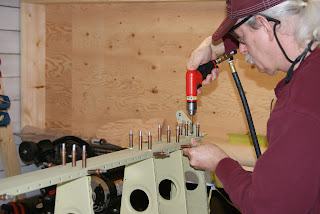
Match drilling the two center holes in the flaperon
hinge bearing bracket into the inboard W-1210 rib’s aft flange.
After disassembly for deburring, the right wing’s
rear spar was once again secured in place with Clecos and riveted onto
the aft flanges of the W-1210 ribs. As with the left wing, solid rivets were
used as opposed to the LP4-3 and LP4-4 pop rivets that would normally be used
on the rear spar.
One procedural change employed was the riveting
of the four flaperon hinge bearing bracket rivets using a rivet gun and a
bucking bar as opposed to the pneumatic squeezer. The pneumatic squeezer was
used on the left wing but the clearance was very tight and it was a fight to
get on the rivets remotely square … so for the right wing, the rivet gun was
tried. The metal parts at this location are
quite thick so there is no chance of denting the metal if the rivets are driven
properly. This worked quite well and it would have saved me a lot of time had I
done it in the first place on the left wing … changing yokes and rivet sets
trying to find a combinations that worked was such a hassle because it had to
be done for almost every rivet on the hinge bearing bracket.
Anyway, the four rivets that were driven into
the hinge bracket using the rivet gun and bucking bar were AN470AD4-7 rivets.
All the remaining rivet holes offered great access for the pneumatic squeezer so
it was used to rivet all the remaining rivets that secure the rear spar onto
the aft flanges of the W-1210 ribs. The rivets used at the doubler plate locations
on the rear spar where AN470AD4-6 rivets and the remaining rear spar to W-1210
aft flange rivets were AN470AD4-4 rivets.
Riveting the rear spar onto the aft flanges of
the W-1210 ribs with the pneumatic
squeezer using AN470AD4-4 solid rivets in
place of LP4-3 pop rivets.
The right wing’s rear spar riveted in place using
entirely solid rivets … looks great!
Normally, the next step would be installing the
nose ribs onto the right spar … but decided to put that on a short hold and
focus on cutting the landing light hole in the W-1203R wing skin at this point
in time. When cutting the landing light hole in the left wing’s W-1203L skin,
the wing skin was placed on the work bench and cut with a jig saw. The bottom
portion of the cut went OK because the edge of the cut could be kept close to
the edge of the workbench but while cutting the top portion of the landing light cutout which is above
the leading edge curve, the skin flapped
around quite a bit ... which was troubling.
While the W-1208 nose ribs are still available,
want to try using Clecos to secure the wing skin onto a few W-1208 nose ribs in
the hopes that it will help keep the wing skin tensioned and hopefully better secured
while the cutout is being made with the jig saw. Theoretically, it should. For some reason it is very difficult for me
to rivet the skin in place first and then attempt cutting it … because if
something goes wrong, there will be a huge number of rivets to remove in order
to replace the skin.


